Set up SAML authentication
You can configure the Intelligence Center to allow users managed by an external SAML IdP (Identity Provider) to sign in to the Intelligence Center.
To set up SAML authentication for the Intelligence Center:
Have a SAML IdP available.
Configure the Intelligence Center to perform authentication through SAML as a service provider.
Generate a SAML metadata XML file, so that the identity provider can recognize the Intelligence Center instance as a legitimate service provider.
Contents
SAML users and Intelligence Center users
Automatic user creation
When a SAML user signs in on the Intelligence Center for the first time, a Intelligence Center user with the same user name.
These new Intelligence Center users are marked as “external” by adding these attributes to the user:
external_auth_system = "saml"
external_auth_id = <external_user_id>
Do not mix local and SAML users
If a SAML user signs in on the Intelligence Center, and a “local” user with the same user name already exists, that user will be marked as “external” and:
Must sign in using the SAML IdP service.
User passwords cannot be changed on the Intelligence Center.
Changes to user profiles on the Intelligence Center will not persist.
Delegate user access rights management to SAML IdP
SAML users should have their permissions managed on the SAML IdP, and not on the Intelligence Center.
SAML authentication flow
The following diagram describes the SAML authentication flow:
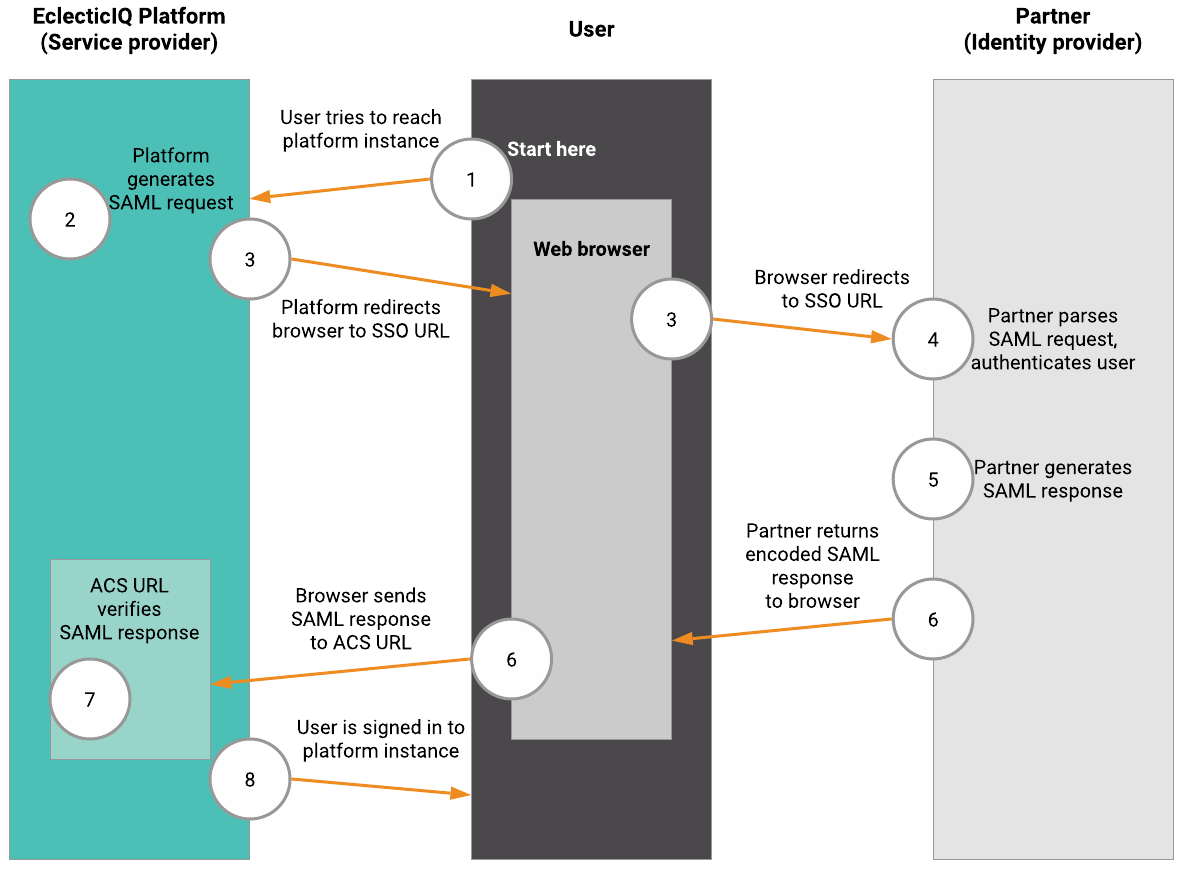
The user makes a SAML sign in request to the Intelligence Center.
the Intelligence Center acts as the service provider, and it redirects the user to the identity provider.
The identity provider identifies the user, and it issues a document back to the user.
The user makes a request to the service provider to pass a token, and then the user requests the target resource (for example, a web page).
The service provider delivers the requested resource.
Access the SAML guided configuration
the Intelligence Center provides a SAML configuration tool at https://${your-ic-instance-base-url}/private/saml/configure to help you with configuring and debugging your SAML settings on the Intelligence Center.
To access the configuration tool:
Add to /etc/eclecticiq/platform_settings.py the following:
SAML_AUTH_ENABLED=TrueSAML_CONFIGURE_MODE=TrueSAML_CONFIGURE_MODE must be set to False for the Sign in with SAML button to appear.
Go to https://${your-ic-instance-base-url}/private/saml/configure to access the guided SAML configuration page.
Sample guided SAML configuration page:
SAML can be configured by exchanging metadata files between the Service Provider (this EclecticIQ Platform) and the Identity Provider (the SSO point for users). If an INTERNAL SERVER ERROR occurs during configuration, please inspect the eiq-backend-web.log for details. 1: Set SAML_METADATA_CONTACT_PERSON, SAML_METADATA_ORG for your organization. 2: Make sure the server domain is configured correctly so that it matches what a user uses. Note that this domain is assumed to use HTTPS and cannot contain a port number. Go to the UI -> System Settings -> General to set the domain. 3. If required, set the filenames for SAML_ENC_KEY and SAML_ENC_CERT as the key pair to use on the platform side for signing and encrypting the authentication request. Also set the flags SAML_WANT_ASSERT_SIGNED and SAML_WANT_RESPONSE_SIGNED as needed. 4. Upload the Platform Metadata to the IDP. 5. Download the IDP Metadata and place it in the Platform file system. Then set SAML_IDP_METADATA to point to the file, like so: {"file": "/etc/eclecticiq/saml-idp-metadata.xml"} Note that a url can also be used: {"url": "https://idp-service/metadata"} 6. Set SAML_IDP_ENTITYID so that it exactly matches the "entityID" attribute of the "EntityDescriptor" element in the IDP metadata file. 7. Set SAML_SIGN_AUTHN_REQ as required and SAML_REQUEST_USE_POST_BINDING if the authn request should use POST instead of Redirect. 8. Set SAML_AUTH_ENABLED to true and test the login. If the request is denied by the IDP this might be caused by invalid or missing signatures, or using redirect binding while POST binding is required. 9. If the IDP accepted the login, login attempt info will show up. The Platform will try to find or create a user, if it has the available information. This information must be provided by the IDP through mapped attributes: - SAML_USER_USERID_ATTR must point to the username field - SAML_USER_EMAIL_ATTR must point to the email field - SAML_USER_ROLES_ATTR can contain zero or more Roles that are specified in the Platform. Default roles in the platform are "Threat Analyst", "Team Lead", and "System Admin". Note that the SAML_CASE_SENSITIVE_MATCHING flag applies to finding matching roles and groups. - Same for SAML_USER_GROUPS_ATTR. A user must be a member of at least one group. The default group on a new platform installation is "Testing Group". - Either SAML_USER_IS_ADMIN_ATTR or SAML_ADMIN_ROLE_GROUP_NAME can be used to flag users as Platform admin. The SAML_ADMIN_ROLE_GROUP_NAME should match one of the roles present in the SAML_USER_ROLES_ATTR. - FIRSTNAME and LASTNAME are optional fields. In the Login Attempt Info section all the data the Platform received from the IDP is displayed. This can be used for debugging attribute mapping issues. 10. If everything works as intended, copy the "Current Configuration" at the bottom of this page into platform_settings.py.Configure the SAML parameters
To configure SAML authentication in the Intelligence Center:
|
Attribute name |
Example |
Description |
|
SAML_AUTH_ENABLED |
True |
Set to True to enable SAML on the Intelligence Center. |
|
SAML_CONFIGURE_MODE |
False |
Must be set to False to allow SAML to be enabled for the Intelligence Center, and for the Sign in with SAML button to appear. Set to True to make the https://${your-ic-instance-base-url}/private/saml/configure endpoint available. |
|
SAML_USER_ROLES_ATTR |
“Content User”, “Threat Analyst” |
(Optional) Can contain zero or more Intelligence Center roles, entered as a comma-separated list of values. These values are case-sensitive and must match exactly roles on the Intelligence Center instance. |
|
SAML_USER_GROUPS_ATTR |
“Testing Group”, “Group Name One” |
Must contain one or more Intelligence Center group. A Intelligence Center user must belong to at least one group. These values are case-sensitive and must match exactly roles on the Intelligence Center instance. |
Example
# SAML can be configures using a live configuration page# When this is enabled, go to /private/saml/configure to set up SAML.SAML_CONFIGURE_MODE = FalseSAML_TEST_CONFIG_FILE = "/tmp/eiq_platform_saml_test_config.json" # nosec# The IDP metadata file should be generated by the IDP and placed on# the platform instance:SAML_IDP_METADATA = { "url": "https://samltest.id/saml/idp", # "file": "/idp-metadata.xml",}# IDP EntityID must match the "EntityID" attribute in the idp metadata:# Keycloack uses a url like 'http://localhost:8080/auth/realms/master'# but it can be any string:SAML_IDP_ENTITYID = "https://samltest.id/saml/idp"# Optionally require users to have a minimum authorization level in order to# log in. if set to None, there is no minimum level and any user is accepted.SAML_IDP_MINIMUM_LEVEL: Optional[str] = NoneSAML_REQUEST_USE_POST_BINDING = FalseSAML_CASE_SENSITIVE_MATCHING = True# Required attributesSAML_USER_USERID_ATTR = "uid"SAML_USER_EMAIL_ATTR = "email"SAML_USER_GROUPS_ATTR = "eclecticiqGroups"SAML_USER_ROLES_ATTR = "eclecticiqRoles"# Optional attributesSAML_USER_FIRSTNAME_ATTR = "givenName"SAML_USER_LASTNAME_ATTR = "sn"SAML_USER_IS_ADMIN_ATTR = "isEclecticIQAdmin"SAML_ADMIN_ROLE_GROUP_NAME = "EclecticIQAdminsGroup"SAML_SIGN_AUTHN_REQ = FalseSAML_SIGN_LOGOUT_REQ = FalseSAML_WANT_ASSERT_SIGNED = TrueSAML_WANT_RESPONSE_SIGNED = False# Key and certificates; these should point to filenames.SAML_ENC_KEY: Optional[str] = NoneSAML_ENC_CERT: Optional[str] = None# Path to the system's xmlsec1 binary.SAML_XMLSEC_BIN = "/usr/bin/xmlsec1"SAML_METADATA_ORG = { "name": "Default organization name", "display_name": [("Organization display name in English", "en")], "url": "http://example.localhost",}SAML_METADATA_CONTACT_PERSON = { "given_name": "John", "sur_name": "Smith", "contact_type": "technical",}Test SAML authentication
To test SAML authentication, you need an IDP (the Intelligence Center role is a service provider).
Keycloak and Shibboleth are two open source SAML IDPs you can use for this purpose. You can choose either.
As an example, these are the steps to set up Keycloak:
docker pull jboss/keycloakdocker run -e KEYCLOAK_USER=admin -e KEYCLOAK_PASSWORD=admin -p 8080:8080 jboss/keycloakTo test SAML authentication in the Intelligence Center, you can use the following example as a guideline.
Open the /etc/eclecticiq/platform_settings.py file, and enable SAML authentication.
Generate an SSL key/certificate pair.
You can use this handy Bash script to do that (requires OpenSSL).
Save the generated files to a directory.
Specify the correct paths to the key and the certificate in the /etc/eclecticiq/platform_settings.py file:
SAML_AUTH_ENABLED=TrueSAML_ENC_KEY='/tmp/saml-keys/platform-saml-key.pem'SAML_ENC_CERT='/tmp/saml-certs/platform-saml-cert.crt'Restart systemd services, so that systemd can reload all configurations, and it can apply any changes to make them effective.
To restart systemd-managed Intelligence Center services through the command line:
systemctl restart eclecticiq-platform-backend-servicesGo to the Intelligence Center sign in page, and verify that the page includes the option to sign in with SAML.
Generate the SAML service provider metadata, which register the Intelligence Center instance with the designated identity provider:
Log in to the Intelligence Center host system.
Switch user to root:
# Root-access login shellsudo-iActivate a Python virtual environment for the Intelligence Center:
source/opt/eclecticiq-platform-backend/bin/activateExport the Intelligence Center settings configuration to create the necessary environment variables, and create the SAML metadata for the identity service provider:
exportEIQ_PLATFORM_SETTINGS="/etc/eclecticiq/platform_settings.py"eiq-platform saml generate-metadata --output-file/tmp/saml-serviceprovider-metadata.xml
Go to the save-to directory — /tmp in the example — and verify that the XML metadata file exists.
Upload, send or transmit the metadata file to the configured SAML identity provider.
This may vary, depending on your SAML implementation, and on the configured SAML identity provider.
Go to the Intelligence Center sign in page, and verify that the page includes the option to sign in with SAML.
Use the SAML option to sign in using valid SAML user credentials.
You should be signed in with the user whose credentials you entered to authenticate, and you should be redirected to the Intelligence Center dashboard.